
Getting Started with the Idea
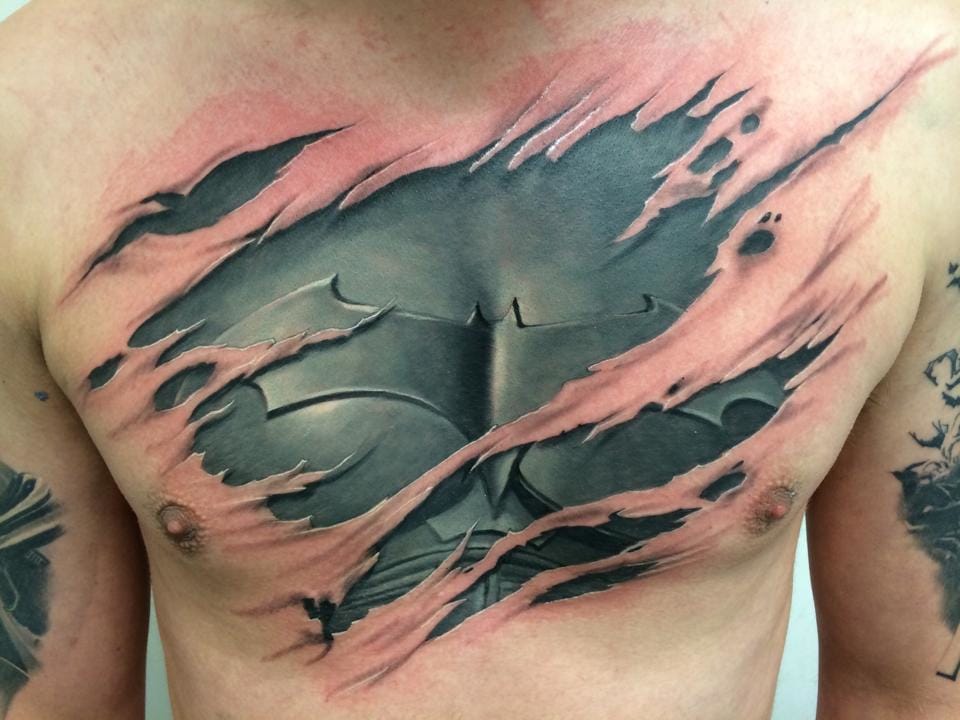
Alright, so the other day, I got this itch to practice something a bit more gnarly, you know? Been seeing a lot of those torn, ripped skin tattoos and thought, “Yeah, I gotta give that a shot on some fake skin.” It’s one of those effects that looks super cool if you can pull it off, but also super easy to mess up, I reckon.
Setting Up My Little Lab
So, I dug out my practice setup. Here’s what I basically grabbed:
- My trusty old sheet of fake skin. Still got a few clear spots on it.
- My machine, obviously.
- Needles – mostly a liner for the sharp edges and a mag for the shading and color.
- Inks – this was key. I picked out a few reds, a darker one almost like dried blood, and some black for the deep shadows. Also had some flesh tones, thinking I might need ’em.
Didn’t have a super concrete design. I just kinda sketched out a jagged tear on paper first, then transferred a very basic outline onto the fake skin. Figured I’d wing a lot of the details as I went. Sometimes that’s more fun, right?
Laying Down the First Lines
Okay, stencil on. First thing was to get those outer edges of the “skin” looking like they’re actually torn. This part’s important, gotta make ’em irregular. I used my liner, tried to be a bit shaky but controlled, if that makes any sense. Didn’t want perfectly smooth lines here, that’d just look weird. The idea was to create that flap of skin that’s peeling back.
Building Up the “Guts”
Now for the main event: the stuff underneath the ripped skin. This is where I switched to my mag shader. I started layering in the reds. Went with a brighter red first, then started building up darker tones in the areas that would be deeper or in shadow. The goal was to make it look like raw flesh, maybe some muscle tissue. It’s all about creating that illusion of depth. I tried to imagine how the skin would actually tear and what you’d see. Slow and steady was the name of the game here. You rush this part, and it just looks flat and muddy.
I also focused on the edges of the “torn skin” itself, adding shadows underneath where it would be curling up. This helps sell that 3D effect, makes it look like the skin is actually lifting off. It’s kinda like sculpting with shades, I guess.
What I Struggled With
Man, fake skin can be a pain sometimes. It doesn’t always take the ink like real skin, and getting smooth blends for those shadows under the curl? Tricky. I think I might have overworked one little section trying to get it dark enough, and it started to look a bit chewed up. Had to back off a bit there. Also, making the “flesh” look truly organic and not just like a patch of red ink is harder than it looks. It’s easy for it to look cartoonish if you’re not careful with your values.
The Final Look and What I Learned
So, after a good while of poking and shading, I sat back and took a look. Is it a masterpiece? Nah, not even close. But as a practice run? Pretty decent, I’d say. The ripped edges look okay, and there’s some sense of depth to the fleshy bits. Definitely learned a few things.
Next time, I think I need to be more deliberate with my light source from the get-go to really nail those shadows. And maybe use a wider range of reds and even some purples or deep browns for more realistic depth in the “wound.” It’s all about practice, right? Every time I try something like this, I pick up a little something new. Good enough for a day’s work on a piece of rubber!


